Quick start: Forms
In Claris Studio, a form view is a multi-page web form that you can customize and then share with others, either with users in your team or with anyone who has the link (no sign-in required). As users fill in the form and submit their responses, you can view the data without leaving your form view.
Some great ways to use forms include registration for events (seminars, summer camps), opinion surveys, and customer feedback.
Create a form view
-
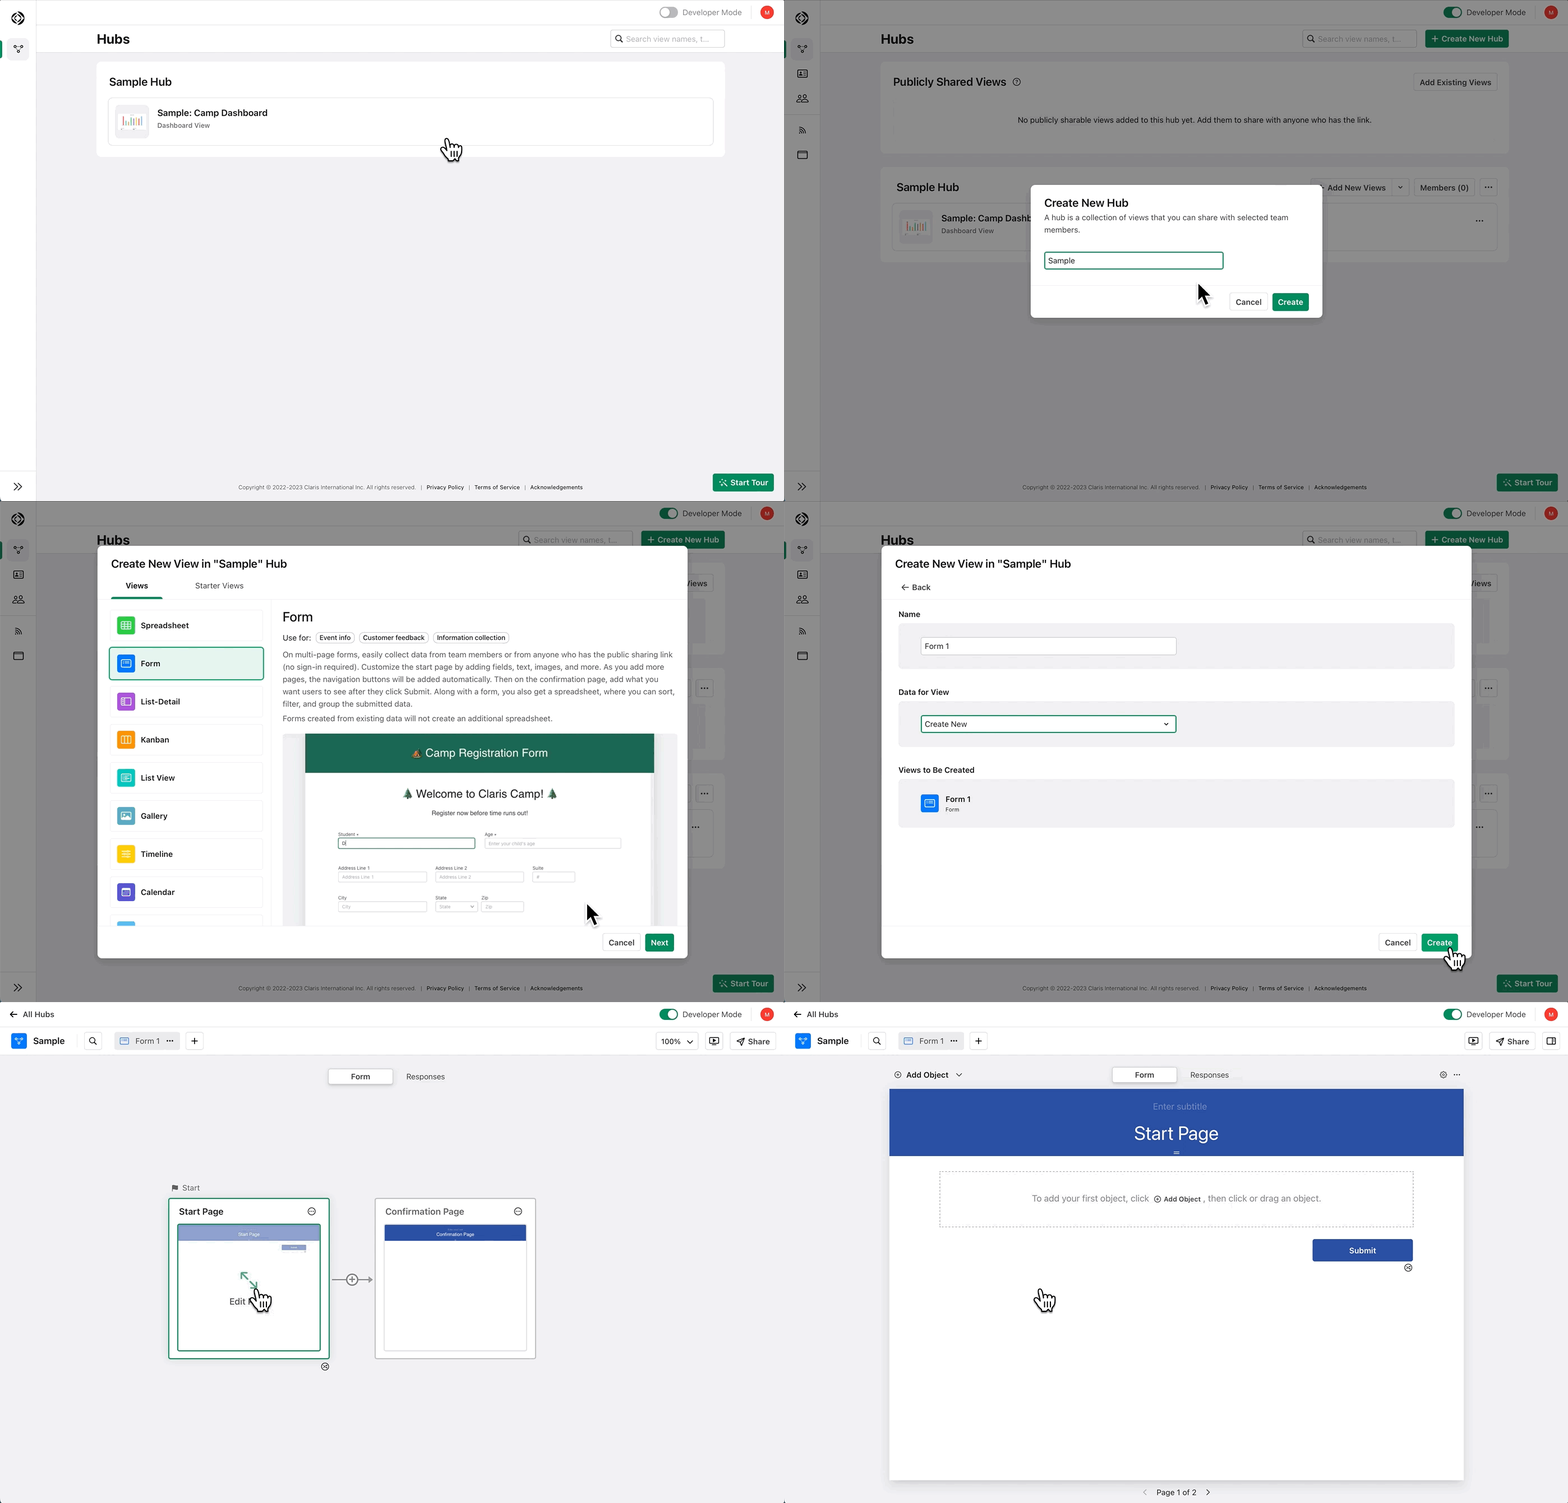
Go to Claris Studio and turn on Developer Mode if it isn't already.
-
On the Hubs page, locate an existing hub you'd like to create a form view in.
If you don't have any hubs yet, click Create New Hub and give your new hub a name.
-
In your hub, click + Add New Views.
-
Choose Form, then click Next.
-
For Name, give your form view a name.
-
For Data for View, choose Create New, then click Create.
Now your form view opens, showing you two pages on the canvas (all forms have at least two pages). From here, you can change the names of these pages and add more pages between them.
Above the form pages are the Form and Responses tabs. You can click these tabs to switch between designing a form and viewing the response data. We'll look at the Responses tab a little later.
-
In your form view on the canvas, click the first page (Start Page).
Customize your form
Make the form view your own: add fields or other objects to the pages, edit the header (for example, add a logo and a background image), rename the pages, add pages, and more. For now, let's just add a few fields.
-
In your form view, click the Start Page on the canvas to edit it.
-
In the toolbar, click
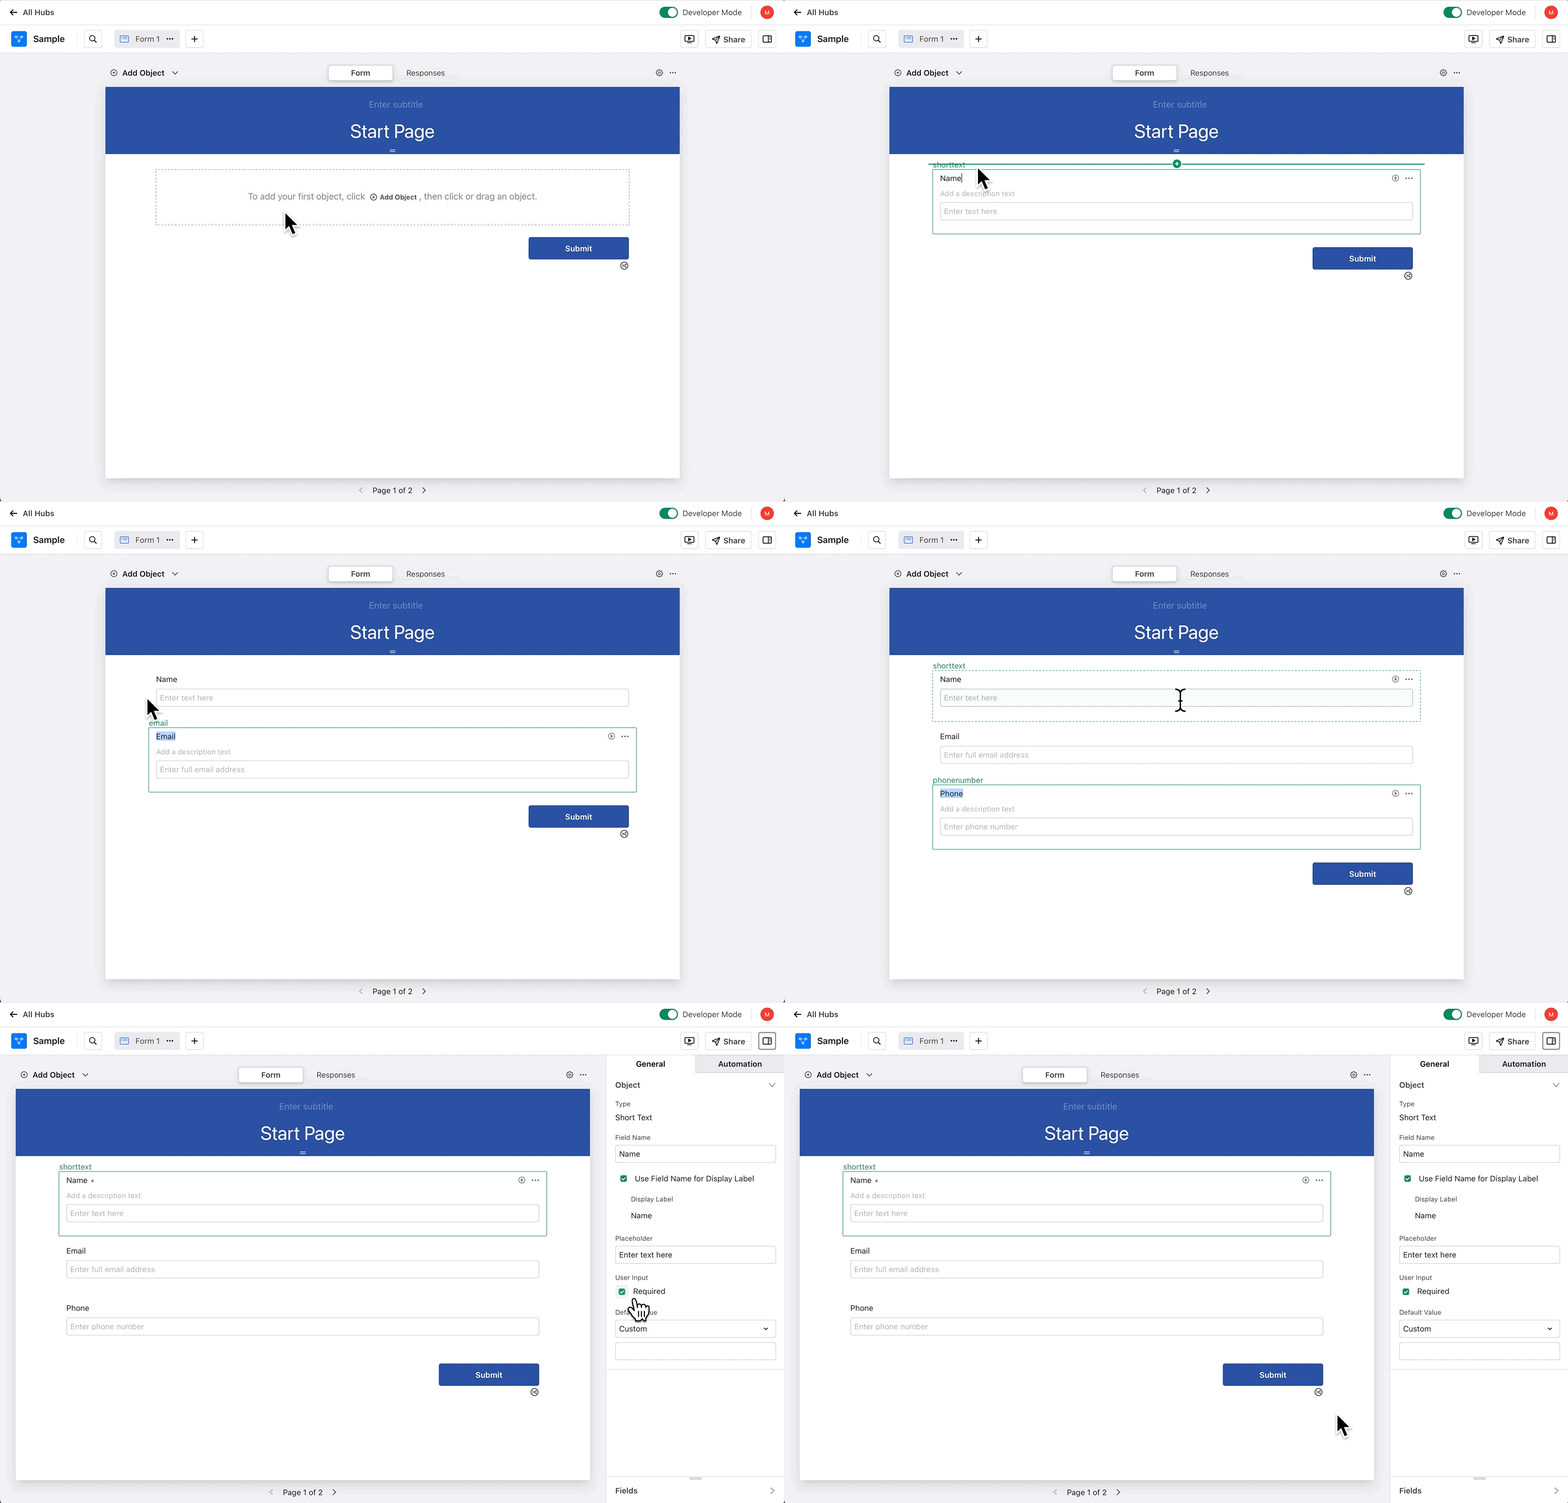
Add Object, then under Field Objects, drag Short Text to the page.
The green indicators show you where the field object will go when you drop it.
-
Select the field object and, if the Properties pane on the right isn't open, click
in the toolbar.
Here you can change the default name of the field to something meaningful to you—for example, from Short Text to First Name. Field names also appear in the columns of a spreadsheet view and in other places in Claris Studio where you choose an existing field.
Notice that the field object's display label also changed to match the new field name. The display label is what users see when they fill in the form. If you want users to see something different from the field name, you can edit the display label in the field object or in the Properties pane. (Changes to a field name also apply to the display label until the first time you edit the display label, then they're independent.)
-
Continue adding field objects as needed.
For example:
-
Add another Short Text field and name it Last Name.
-
Add a Phone field.
-
Add an Email field.
Notice how objects move to make room for a new object. You can have up to three objects in a row and as many rows down the page as you want.
-
-
To require users to fill in a field before they can submit the form (for this exercise, let's say the Phone field), in the Properties pane, select Required.
Try out your form
Now that you have your first form, try it out yourself.
-
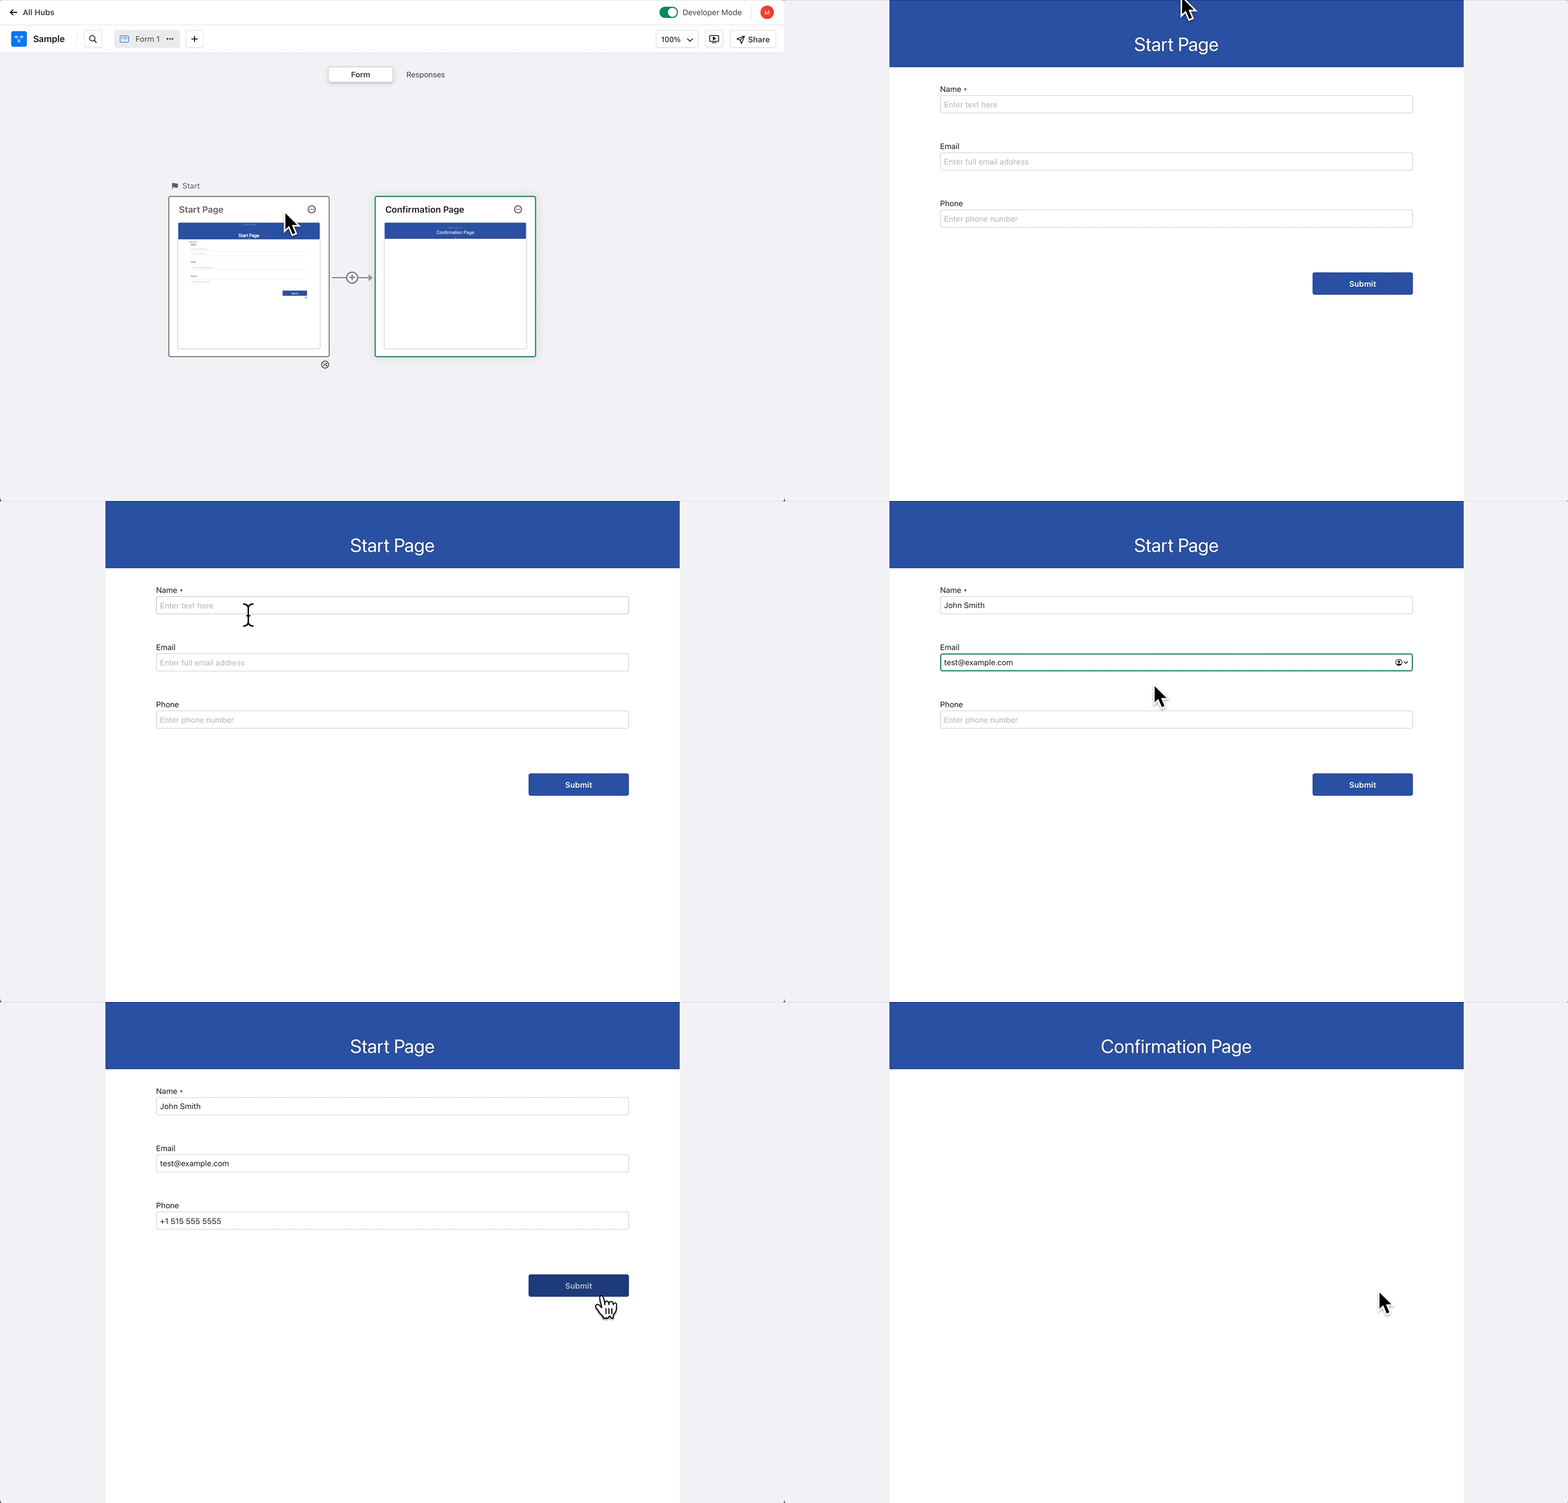
In your form view, click
to open it.
The form view opens in a new web browser tab or window with Developer mode turned off.
-
You can now fill in the form.
Notice that the Email and Phone fields will warn you if what you entered doesn't look like a valid email of phone number. And if you leave the Phone field empty when you try to submit the form, you're reminded that a phone number is required (because you chose the Required option in the Phone field).
-
When you're done, click Submit.
Your data is submitted and the last page in your form is displayed. In the default form, this is the Confirmation Page.
-
To get back where you were, you can just close the new web browser tab or window.
If you want to see your submitted data now, skip ahead to Now, where's my form data?.
Invite users to your team
Before you can share your form with team members, you'll need to invite some users to your team.
-
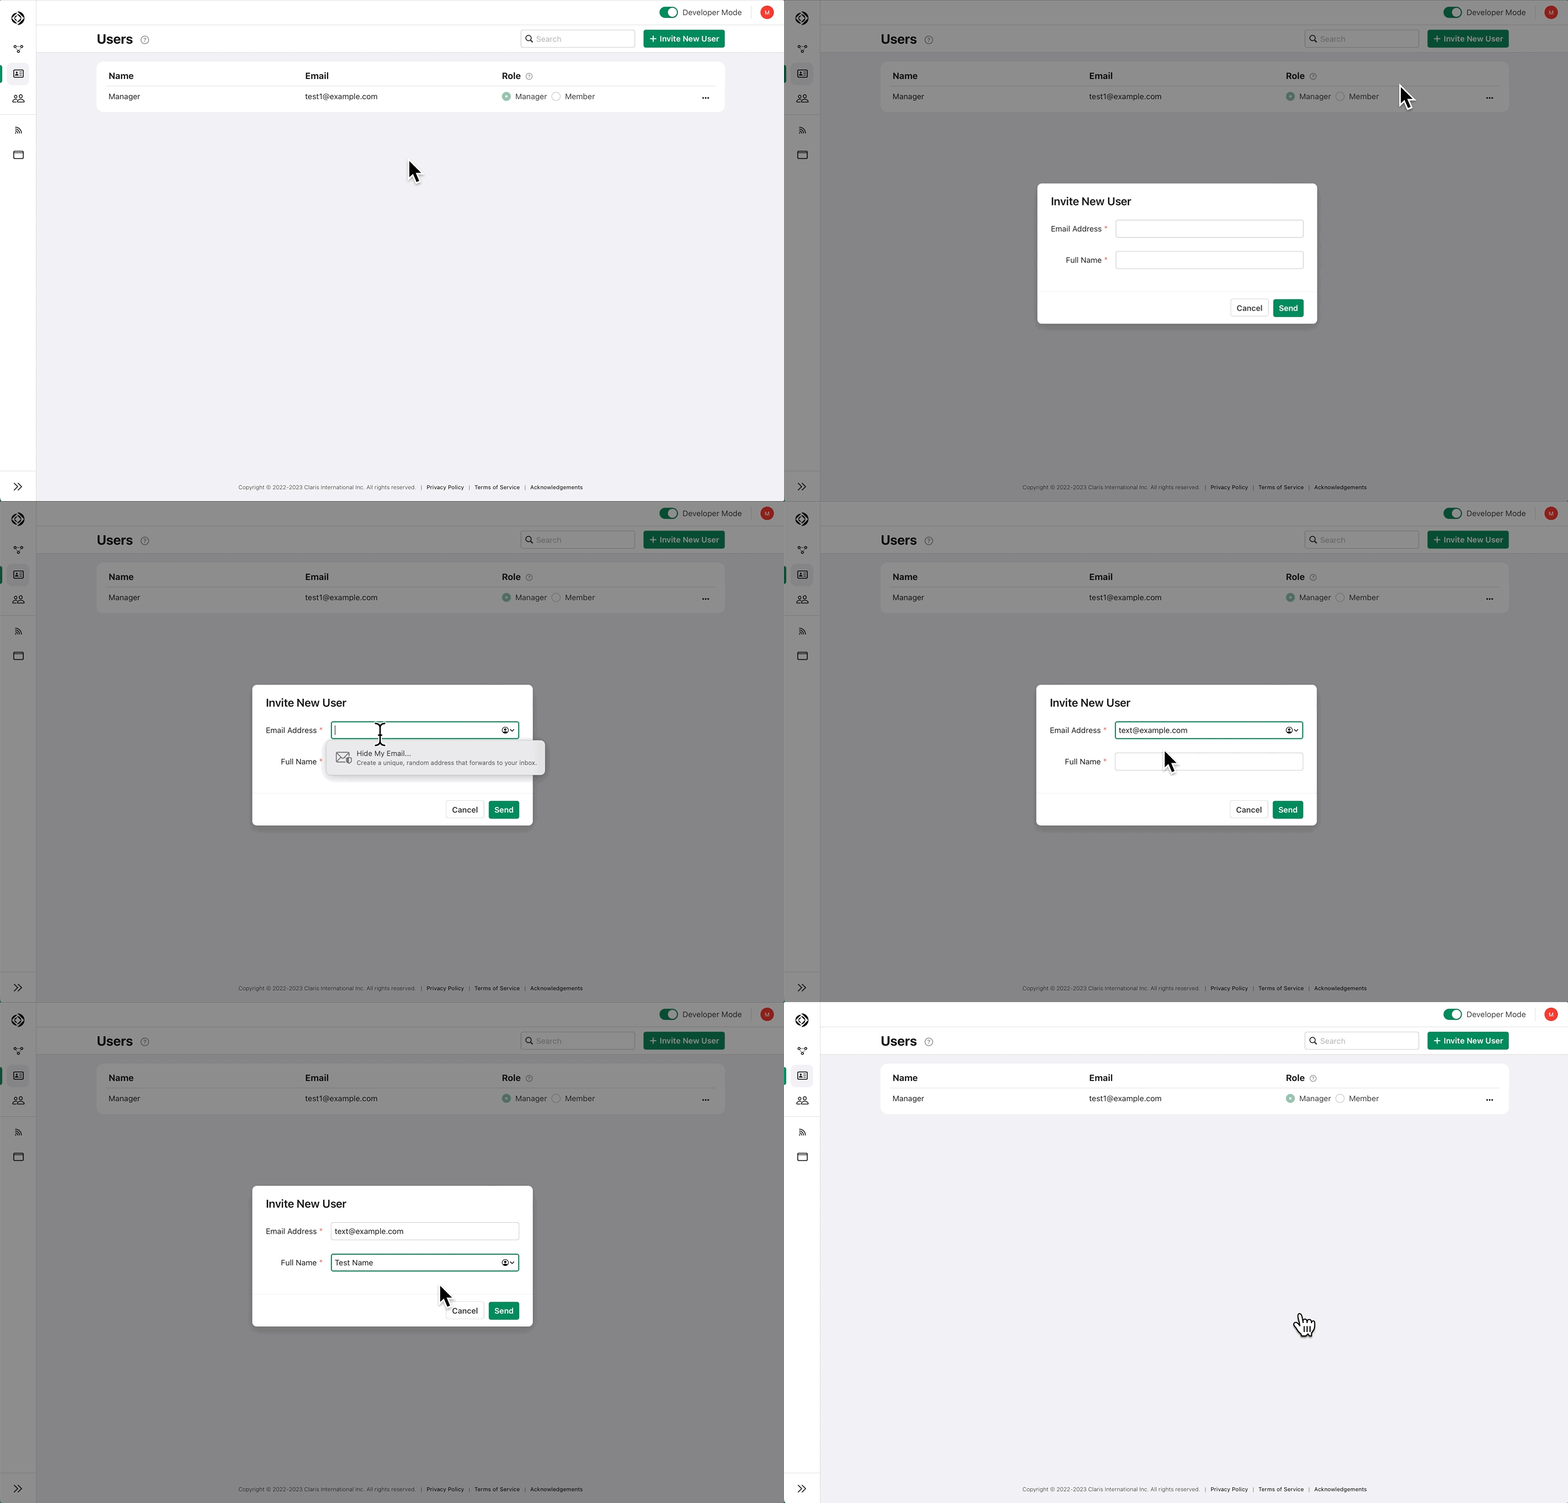
Click All Hubs, turn on Developer Mode (if it isn't already), then click
Users in the left pane.
-
Click Invite New User, enter their email address and name, then click Send.
An email is sent to this user with a link to join your team. Until they click that link in the email, they'll appear as "Pending" in the list of users.
By default, a new user is a team member, as shown in the Role column. Team members can fill in forms and use other views that are shared with them via hubs, but they can't create or edit views. For the purposes of this exercise, just leave the Role as Member.
-
Repeat the above steps for each user you want to add.
Share your form with team members
Now you're ready for your team members to fill in your form. Team members can only fill in your form and submit data—they can't edit the form itself. To share your form only with team members, you add your form view to a hub. Think of a hub as a named folder that you add views to and let certain team members access.
Let's add your form to the hub you created earlier, then add the team members you want to share it with.
-
Click
Hubs in the left pane and turn on Developer Mode if it isn't already.
-
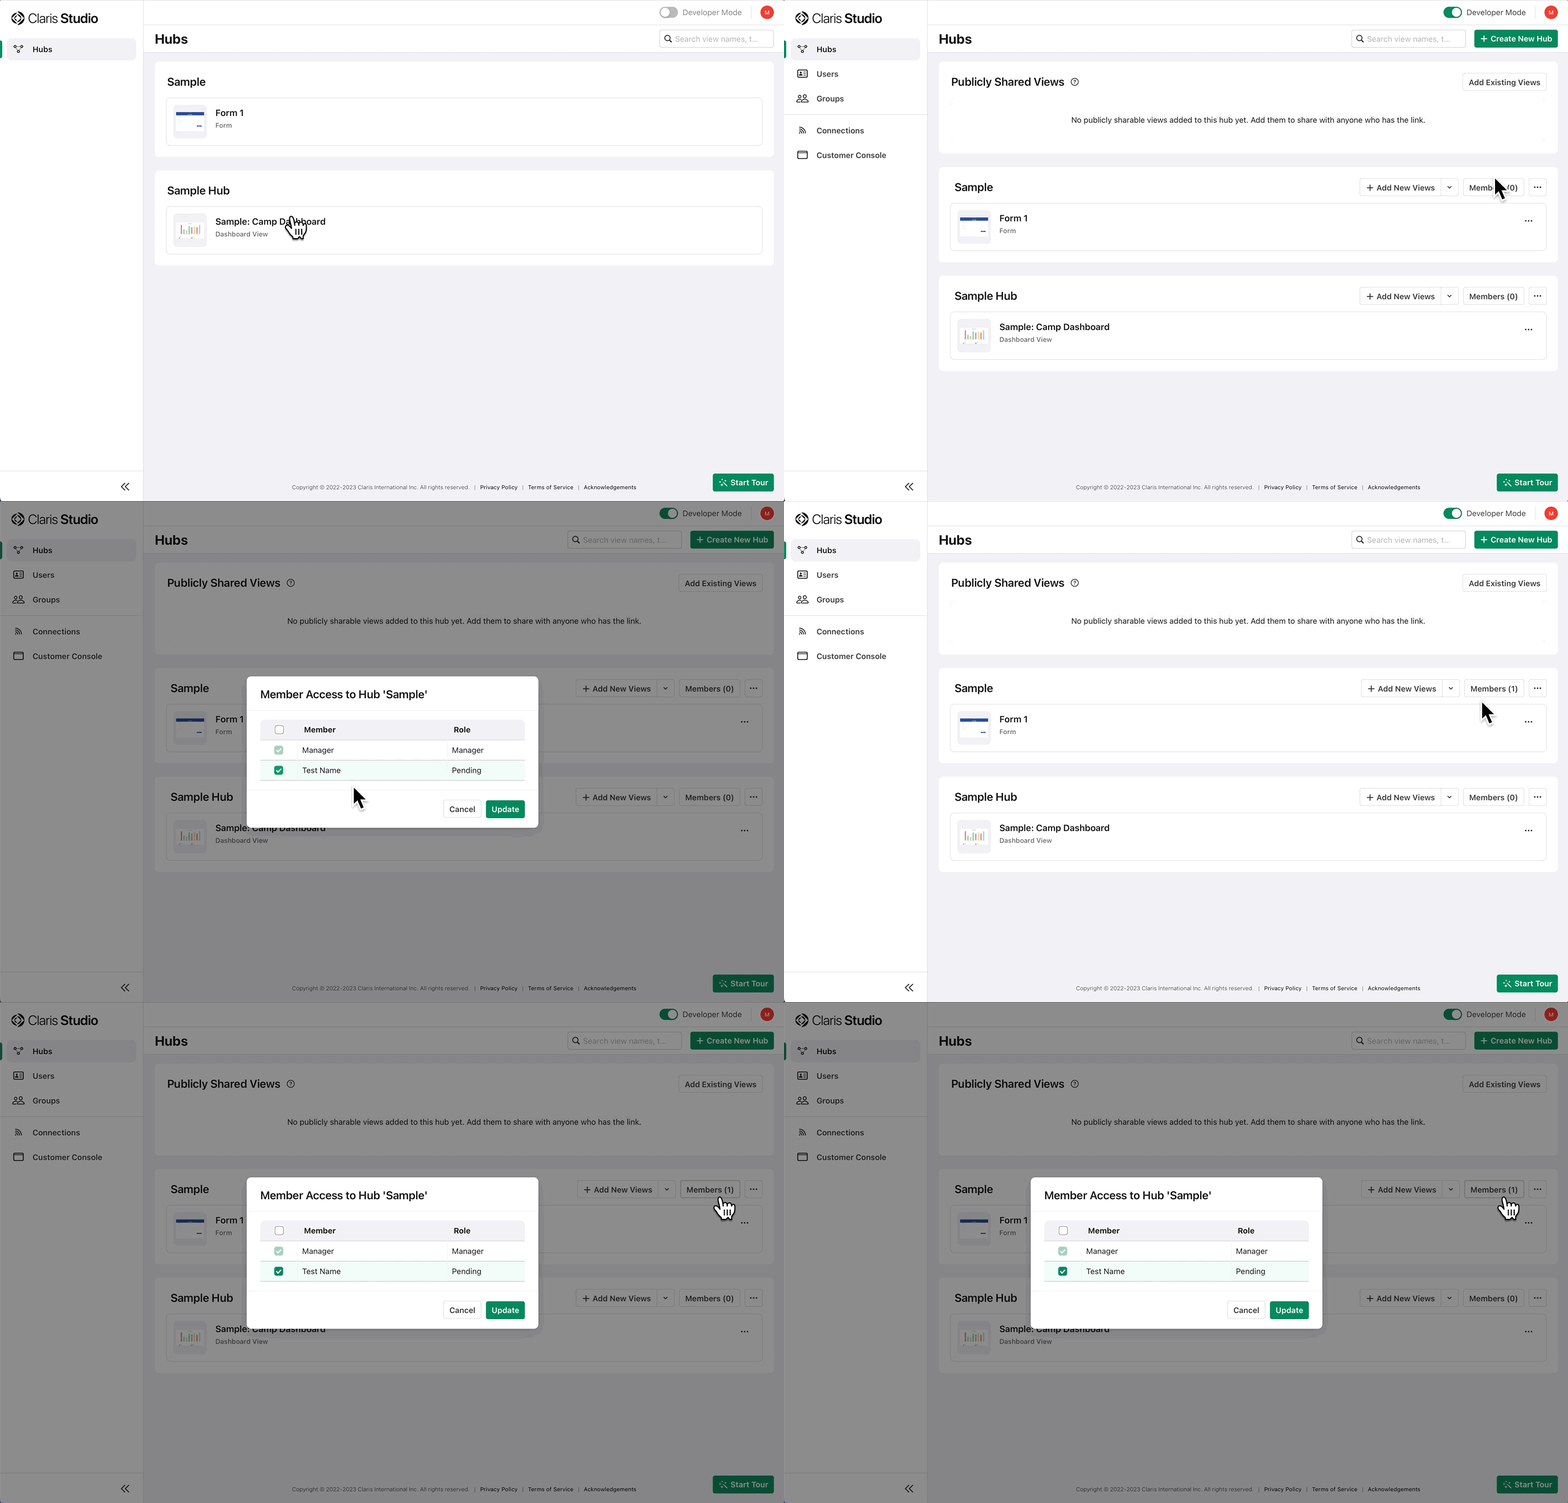
In the hub you created earlier, click Members, select each member you want to give access to, then click Update.
Any team members you add to the hub will be able to open this form and fill it in.
Remember: Any views you add to this hub later will also be accessible by these team members.
The next time the team members you added visit the Hubs page, they'll see your new hub and can click the form view to fill it in. Just let them know you're ready for them to fill in your form.
Share your form with anyone
You can also share your form with anyone you give the link to. They don't need to be in your team or even signed in with a Claris ID.
-
In the left pane, click
Hubs and turn on Developer Mode if it isn't already.
-
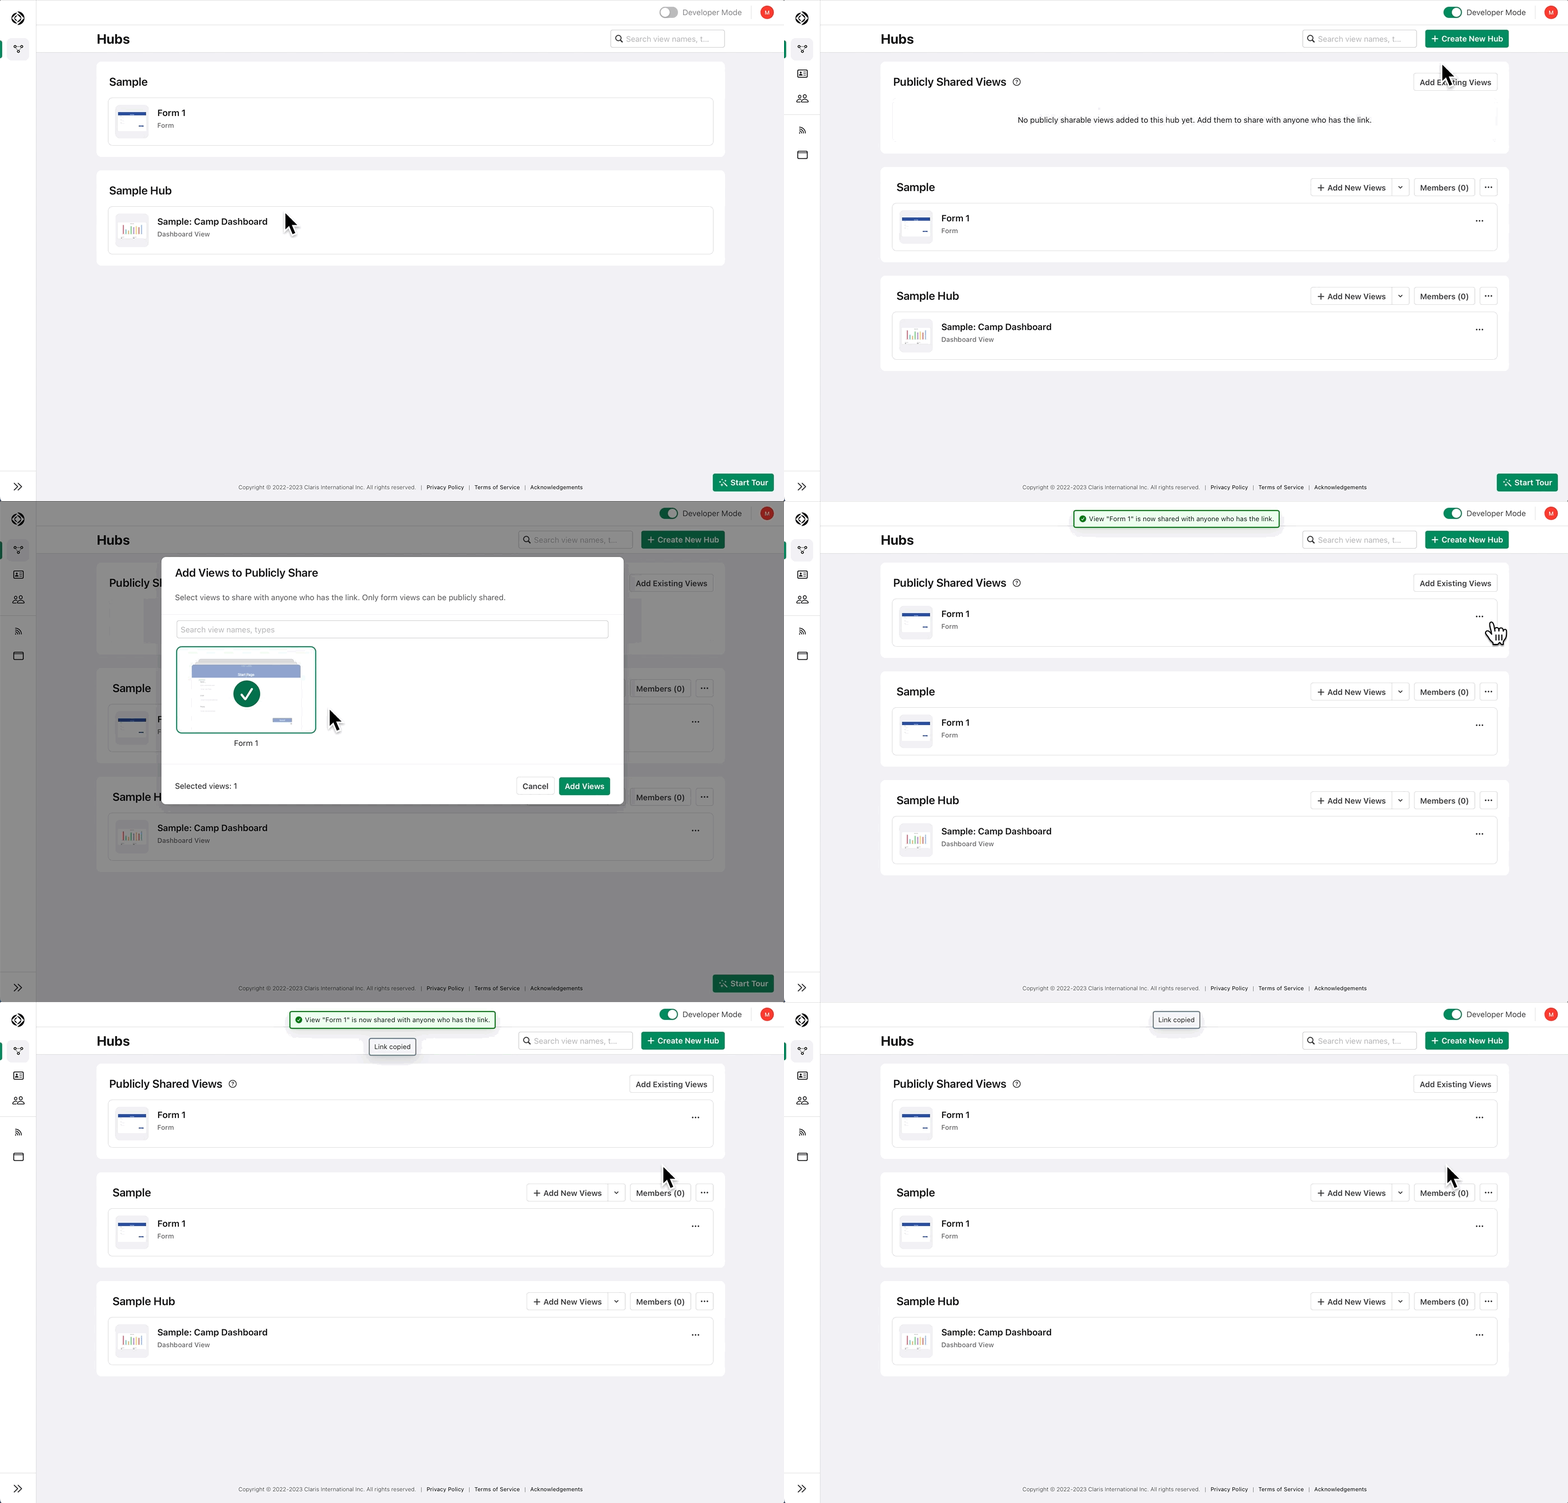
In the Publicly Shared Views hub, click Add Existing Views, select your form view, then click Add Views.
Your form view is now shared with anyone who has the link.
-
To get the sharing link, click
on your form view, then choose Copy Link.
The sharing link is now on your clipboard, ready for you to paste into an email or post wherever your form users will see it.
Now, where's my form data?
In Developer mode, there are two ways to see the data that users submit using your form:
-
At the top of your form view, click the Responses tab.
This tab is a simple spreadsheet for viewing, searching, and editing response data. It shows only the fields that are on the pages of your form view. Use the Responses tab to get a quick update on the responses users have submitted.
-
In the Responses tab, click Create Spreadsheet.
This creates a full spreadsheet view using the same data as your form view. By default, this spreadsheet is created in the same hub as your form view, so you can access it from your form view's navigation bar at the top by clicking the
tab for this spreadsheet. Use this spreadsheet to get more insight into your data by filtering, grouping, sorting, and summarizing records.
Either way you look at your data, you should see at least one row containing the data you entered in the form (see Try out your form), or more if other users have filled in your form. And for each field on your form, there's a column in the Responses tab or in the spreadsheet view.
Next steps
There's a lot you can do with the data you collected with your form:
-
In the spreadsheet view:
-
Try sorting, filtering, grouping, or searching data to get just what you need.
-
To visualize your data, click Create Dashboard and easily chart your data. When you create a dashboard, it appears as another view that uses the same data as the spreadsheet. You can then edit the dashboard view and add more charts, summaries, and filters.
-
-
If you have a custom app, you can access your form data there as another table and use it anywhere in your app. See Working with a Claris Studio data source in FileMaker Pro Help.
